Home Theater Speaker

Layout Options

Designing your home theater speaker layout to maximize performance may require some help. This video is part of our Home Theater Design Series that covers virtually everything you need to know. Below, you will learn all about the different possible layouts for your home theater system. We explain the best speaker configurations and how to integrate them into your room with options for almost any situation. We’ll help you understand the Dolby Labs speaker terminology and what is best for your home theater. In addition to our world-class home theater design tool, we've given you everything you need to begin your home theater journey in Home Theater Central.

Dolby Atmos Number Scheme Explained

Interestingly enough, there are actually more options for speaker setup & placement than there are flat panel tv screen sizes! In today’s world of immersive home theater, you may have seen number sequences like 7.1.4 or 5.2 or 3.0. It really helps to understand these abbreviations as you are going to see them pop up when you start researching home theater receivers

Decoding this sequence is very easy once you know the key! The first digit is the number of traditional surround speakers in the room that are not overhead speakers — many home theater enthusiasts call these speakers the “bed layer”. In older systems before immersive audio, some of these might have been positioned high or in the ceiling, but in today’s world of Dolby Atmos and DTS:X, that first digit would refer to speakers that should be placed around or a little above ear level. If the first digit is a 5, for example, this means there is a left, center, right, and a pair of surround speakers. 

The next digit is the number of subwoofers. You will normally see most configurations just call out for one subwoofer, but we highly recommend at least 2 for a serious home theater room. 

The third digit is the number of speakers not in the bed layer — the overhead, or Atmos speakers. These may be in-ceiling speakers that are aimed down, or, they may be elevation speakers that sit on top of your main front and rear speakers and fire the sound up toward the ceiling. Some tower speakers even have upward-firing speakers built into the top. Today’s home theater receivers let you designate which type of Dolby Atmos or overhead speaker you are using to keep the sounds perfect.

Most home theater receivers max out at 11 channels, which enables a 7.1.4 setup. There are some receivers and processors that allow you to do 9.1.4 and even 11.1.6 or higher. For the purposes of this help guide, we will stop at 7.1.4 as for most rooms that is more than enough for an amazing experience! And if you want to go beyond 7.1.4, our design tool can show you layouts up to 9.1.6.

This guide will give you some general ideas, but there is nothing better than creating a drawing of your actual room and looking at where the speakers should go in a three-dimensional space. Laying out your room and setup used to take many hours or even days and lots of iterations.

Audio Advice has developed a free home theater design tool that lets you layout your room in minutes and see instantaneous changes as you try different setups! Our experience in thousands of home theaters has taught us a lot about speaker positioning. Getting the overhead and surround speakers in the right position involves both science and art. Then, there is always the decision to be made in a multirow theater of whether you want to focus the sound on just one listening position or arrange things for better coverage for all rows. We even have an AI part of the tool that lets you change the focus from a single chair to all of your chairs and you can see the speakers move in real-time to the ideal positions for your listening goals.

We suggest you look over this guide to think about your possible speaker layouts, then head over to our free home theater design tool to design the perfect layout for your room.

Home Theater Speaker Types & Placement Suggestions

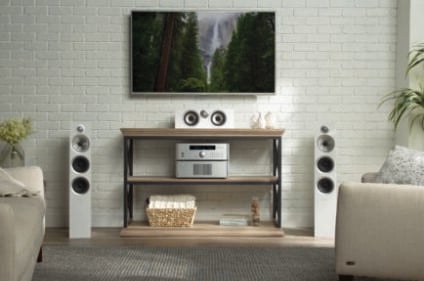
As you go through these different configurations, bear in mind you’ll have choices on what type of speaker to use. For the main speakers, surround speakers, and rear speakers you can use an in-room tower or bookshelf speaker, an on-wall speaker or an in-wall speaker. The Dolby Atmos or overhead speakers can be an in-ceiling speaker or an elevation speaker that would sit on top of your tower or bookshelf speaker. We are even starting to see some tower speakers with the elevation speaker built into the top which is pretty cool. These will have two sets of connections on the rear for the main and elevation. 

You may wind up laying out the perfect room only to find the way your room is constructed does not allow you to put speakers exactly where they should go. This is especially true for ceiling and in-wall speakers. For in ceiling Atmos or overhead speakers, if you have a stud in the way, we find it better to move them to the left or right rather than front to back to find the spot where they can fit in the ceiling between the studs. For side speakers, we will usually suggest you move them slightly backwards, and for rears, move them further apart than closer together. 

In some conditions, it may not be possible to have the speakers symmetrical. If this is the case, don’t give up, just follow our suggestions and bear in mind all of the decent surround sound receivers will let you compensate for different speaker distances. It's better to be off a little than to have no speaker at all!

We will start with the most immersive layout and work down from there. And as if we have not said it enough, these all show just one subwoofer, but in our opinion, you can never have too many subwoofers — so if you can fit 2 or more, go for it! We actually have an entire article on subwoofer placement where you can learn more.

Audio Advice Tip: All of these layouts we discuss are focused on just one row of seats. If you have more than one row, our tool will let you decide how much focus you want to put on the main row or all seats.

Layout Options

7.1.4 - Seven channels plus 4 Dolby Atmos Speakers - Ultimate

With this great setup, we have 3 front channels, a pair of side surrounds, a pair of rear surrounds, and 4 Dolby Atmos speakers. For the ultimate, we recommend going with in-ceiling speakers for Dolby Atmos overhead channels. However, if it is not possible to get the wiring to your ceiling, most speaker brands make a Dolby Atmos elevation speaker you can place on top of your front and rear speakers to reflect the effects off the ceiling. Here we show options for both in-ceiling and upward-firing elevation Atmos speakers.

For this configuration, you’ll need a home theater receiver that supports Dolby Atmos with 11 powered channels or a separate surround sound processor and 11 channels of amps. You’ll find a decent variety of these on the market today. This will give you the ultimate in Dolby Atmos sound quality.

Ideal Setup for 7.1.4

Main Left Center Right
You will want to position your main left and right speakers at anywhere between a 45 to 60-degree angle to your listening position. The center channel should be centered on your screen. Ideally, the height of your left, right and center will be at ear level or slightly higher. The goal is to create the perception that sounds are coming straight from the screen while making sure that your ears are close enough in line with the tweeters to hear the full audio experience. If you place the speakers too high in the bed layer, you will find that there is not enough separation from your overhead speakers and that your ears are not hearing all that was intended from the speaker. If you don’t have an acoustically transparent screen to put your center channel behind, we usually recommend that you place your center channel just below your television or screen.

Surround Speakers

With Dolby Atmos, you want your main side surrounds to be about 1 foot above ear level and about 6” in front of your ears. If you do not have a second row of seats on a riser behind the main level, the rear surround speakers should be at the same level. For the best placement for two or more rows, use our home theater design tool as the rear surround height will be dependent on your riser height and number of rows. The rear speakers are like the front speakers and should be spread out at a 45 angle if possible. Although this will vary based on your seating position in the room. Our tool will move them around to the ideal location based on all the variables. When you combine this well-designed bed layer of speakers with the overhead speakers, you will get an amazing immersive surround.

Audio Advice Tip- If your seating is close to the back wall, go to our tool and it will map out the best placement based on the distance your seats are from the back wall and the width of your seating area.

Atmos Speakers
For in-ceiling Atmos speakers, we feel they work best when spread from a 70 to 90-degree angle from the main seats when looking at them from the side. Just like the surrounds, their placement can vary some based on how many seats you are trying to cover and the height of your ceiling. Our tool will perform all of the real-time calculations to move them to the best spots based on your seating layout and immersion focus area.

For elevation Atmos speakers (or Dolby Atmos-enabled speakers), simply place them on top of your front left and right speakers and rear left and right speakers.

* this Setup has Atmos Elevation speakers

5.1.4 - Five channels plus 4 Dolby Atmos Speakers

We are commonly asked, “Should a theater have one pair of Atmos speakers and both side and rear surrounds OR two pairs of Atmos speakers and one surround pair?” We are also asked, “Should you put the one pair of surrounds on the sides or in the rear?”

We prefer the 5.1.4 layout over what would be a 7.1.2 layout. We also feel that if you are going with Dolby Atmos, you want the one pair of surrounds to be on the sides.

This type of system will need a home theater receiver with 9 powered channels on board. We see a lot of rooms where getting a pair of rear speakers is not possible. This is by far and away the best surround sound solution for a room with those limitations.

Ideal Setup for 5.1.4

Main Left Center Right
Use the same tips as 7.1.4

Surround Speakers
The surround speakers should be about one foot above ear level and at about 6” in front of your ears.The ideal positioning will change as you add more rows as you will see in the design tool.

Atmos Speakers
Use the same tips as 7.1.4

* this Setup has Atmos Elevation speakers

7.1.2 - Seven channels plus 2 Dolby Atmos Speakers

We see many existing home theater systems where there are already seven speakers in the room. If you have this type of layout and want to add Atmos but only do one pair, this is a great option. 

A 7.1.2 configuration will require a home theater receiver with 9 powered channels, just like a 5.1.4 would. We do, however, recommend a 5.1.4 or 7.1.4 layout if you are starting from scratch.

Ideal Setup for 7.1.2

Main Left Center Right
Use the same tips as 7.1.4

Surround Speakers
Use the same tips as 7.1.4

Atmos Speakers
For a single pair of Atmos in-ceiling speakers, they should be positioned at about an 80-degree angle from the primary position as shown in the drawing when looked at from the side. This is basically 10 degrees off a straight line drawn up from your ears which puts them slightly in front of your listening spot. Use our tool to determine their best width.

For elevation Atmos speakers, simply place them on top of your front left and right speakers.

* this Setup has Atmos Elevation speakers

5.1.2 - Five channels plus 2 Dolby Atmos Speakers - Most Popular

The 5.1.2 surround sound speaker layout option is by far the most popular affordable layout we see at Audio Advice. There are a ton of reasonably priced 7-channel Dolby Atmos home theater receivers on the market to choose from which makes getting into it pretty reasonable. It also uses the same number of speakers we used to see in home theaters for years but set up in a new way for a much more immersive sound. If you have a small to medium-sized room and are looking to get the most bang for your buck, this 5.1.2 layout is the best way to go.

Ideal Setup for 5.1.2

Main Left Center Right
Use the same tips as 7.1.4

Surround Speakers
Use the same tips as 5.1.4

Atmos Speakers
Use the same tips as 7.1.2

* this Setup has Atmos Elevation speakers

7.1 Home Theater Speaker Layout - Seven channels with no Dolby Atmos

A 7.1 system will have no Dolby Atmos overhead speakers, so this is not something we currently recommend unless you have an old home theater receiver not capable of Dolby Atmos and you are trying to put together a home theater system using the old receiver. Or, you may be in a situation where it's impossible to get wiring to the ceiling AND have in-wall or on-wall speakers for your fronts and/or rears making it also impossible to place Atmos elevation speakers on top of them. If this applies to you, a 7.1 channel layout will get you the most immersive sound. Some of you may have this exact layout with in-ceiling surround speakers already. If that is the case, we would highly recommend you upgrade to a new Dolby Atmos receiver and configure the receiver for 5.1.2, you’ll get a big improvement in effects!

Ideal Setup for 7.1

Main Left Center Right
Use the same tips as 7.1.4

Surround Speakers
This is a case where we recommend that you raise the side speakers up to help give you more of a full surround effect. About 6 feet off the floor usually works out well. Or, as we show here, you can use an in-ceiling speaker - however, the only reason you would want to do the in-ceiling is if you do not have a Dolby Atmos enabled receiver. If you did, do Atmos! The rear speakers should be mounted at or about a foot above ear level to improve the surround effect with the upper placed side speakers.

Again, this is more of a legacy layout and is only recommended when you have either equipment or room constraints.

5.1 Surround Sound - Five channels with no Dolby Atmos

Even though 5.1 is the most basic of surround sound systems, make no mistake, a good 5.1 system using separate speakers will outperform any soundbar-based system by miles! You can find plenty of entry-level home theater receivers that support 5.1 and some great speaker packages that allow you to do a 5.1 system and not break the bank while still getting great sound. Plus if you have a fairly small room, this system can be more than enough to give you goosebumps if you set it up properly.

Ideal Setup for 5.1

Main Left Center Right
Use the same tips as 7.1.4

Surround Speakers
In this system, since we have no rear speakers or Atmos overheads, we like to see the surrounds placed about a foot in front of your head and about 6 feet off the floor. Or, you could go with an in-ceiling speaker just in front of the main seats. Again, if you can do a Dolby Atmos based system with more speakers, we highly recommend it, but some rooms just do not allow us the flexibility for the speakers we need.

Set Up And Calibration

Once you have installed your home theater speaker layout, it is critical that you properly calibrate it. We have lots of helpful articles on calibration.

Summary

  • Surround sound has many types of speaker options which are expressed in a 3 digit format.
  • Getting your speaker placement right will greatly benefit your surround sound experience.
  • The 7.1.4 setup with 7 speakers at the bed level, 4 Atmos overhead speakers, and one or more subwoofers can provide the ultimate surround sound experience in most rooms
  • The 5.1.2 speaker configuration is the most popular and best value with 5 speakers at ear level, one pair of Atmos speakers, and one subwoofer.

If you have made it to the end, you’ve probably figured out there are options available now to help you get the best sound possible even if you have some physical room constraints or are trying to meet a budget. If you enjoyed this article be sure to check out our companion articles, including our Top 5 Tips for Improving Your Home Theater Video and Top 7 Most Common Home Theater Mistakes. If you now have the bug for even more improvements, you might want to check out our free 3D home theater design tool where you can plan out your ultimate home theater. 

At Audio Advice, we've been designing and installing high-performance home theaters & smart home systems for our customers in North Carolina and the surrounding areas for decades. We know the best upgrades for your home theater audio and video. In fact, we've delivered more custom theaters than anyone in the Southeast! We are now offering Home Theater Design no matter where you live in the United States! If you are interested in a custom home theater or upgrading your current system, give us a call at 888.899.8776, chat with us, or stop by our award-winning showrooms. We can't wait to help you build your ultimate home theater!

Recommended Products

  1. Prime Elevation Speaker


SVS Prime Elevation Surround Speakers - Pair
    Final Price From$499.00 - To$599.00

  1. Klipsch RP-502S Surround Sound Speakers - Pair Klipsch RP-502S Surround Sound Speakers - Pair
    Regular Price Regular Price $1,099.00 Final Price $669.00

FREE Interactive 3D Home Theater Design Tool

Enter your room dimensions, audio, and video preferences while it designs your theater in real-time. Receive optimal screen size, seating locations, speaker locations, and receive precise measurements for your room layout. Work with our system designers via chat, email, phone, or in-store for expert advice, product selections, and more.

Home Theater Buying Guide

If you are in the market for a new home theater system or improving part (or all) of the one you already own, you’ve probably figured out that the options can be more confusing than advanced algebra! Explore our guide to understand the available options and how they might work or not work in your particular situation. If you need help customizing a solution for your space, reach out - we're happy to help!

Wishlist
Copyright © 2024 Audio Advice. All rights reserved.