2-Channel Speaker Set Up Guide

This article is all about how to set up your stereo speakers. Some of you may just be getting into the better sound that separate speakers can provide and may not have given much thought to spending some time trying to get them in a location that might sound better. At the other end of the spectrum, we’re sure some of you have spent hours moving around your speakers, trying to get them in the perfect spot. And some of you might have wanted to try to extract better sound but just didn’t know where to start.
If you do a Google search for setting up speakers, you will see a wide variety of guides out there. Some of them are very intensive, with many hours of listening needed to dial things in. And a lot of them assume you have a room completely dedicated to your stereo system and can place things wherever you want. If you have that, fantastic, but most of us are limited in where we can place our speakers. So, this guide will help you understand some ways to improve your sound, even with limited space. Plus, if you have a rectangular room, it isn’t that difficult to use a little science to find a good starting point for some areas that will keep everyone in your household happy without having your speakers take over your room. Non-rectangular rooms or rooms that are open to other spaces are more challenging and require some experimentation.
First, we want to go over what you will be trying to accomplish and how a little science can help. Any speaker playing in a room will have the primary sound wave coming from the speakers and the sound that reflects off the walls. The reflections are more problematic for bass frequencies and build up in some parts of your room, while other places in your room might cancel them out. To see what we mean, just put on a piece of music with a strong bass track and walk around the edges of your room, then go to a few spots in the middle. You’ll find that the bass is much more pronounced in some areas compared to others. By changing the position of your speakers, you are trying to get them in a spot where the way they interact with your room to decrease or increase lower frequencies is at a minimum at your listening position. The good news is, with a rectangular room, the best spots to put your speakers are somewhat predictable using simple math. We have to give Richard Vandersteen credit for some of the things we are going to talk about, as he came up with a scientific method that works quite well.
We see so many pictures of what could be awesome stereo systems with the speakers placed right against the back wall, even when there is room to move them around, and those just make us cringe. You may be one of those, as you just might not have known any better. If you are like a lot of people who simply have your speakers right against the back wall, the easiest thing to try is just moving them out a little. But if you can dedicate a couple of hours to what we are going to talk about, we feel you will be rewarded with some really improved sound.
If you are thinking about diving into the super fun world of home stereo or upgrading to better speakers, know that our passionate team of music lovers at Audio Advice is here to help. We can talk about your room and what type of speaker would be the best for your space and budget. Once you have your new system, we will be there with best-in-class support to help you get the best sound.
So, let’s get started on making your system sound better with just a little time and no extra money! You’ll want to gather up a tape measure or, even better, a laser one, some masking tape, and some of your favorite recordings.
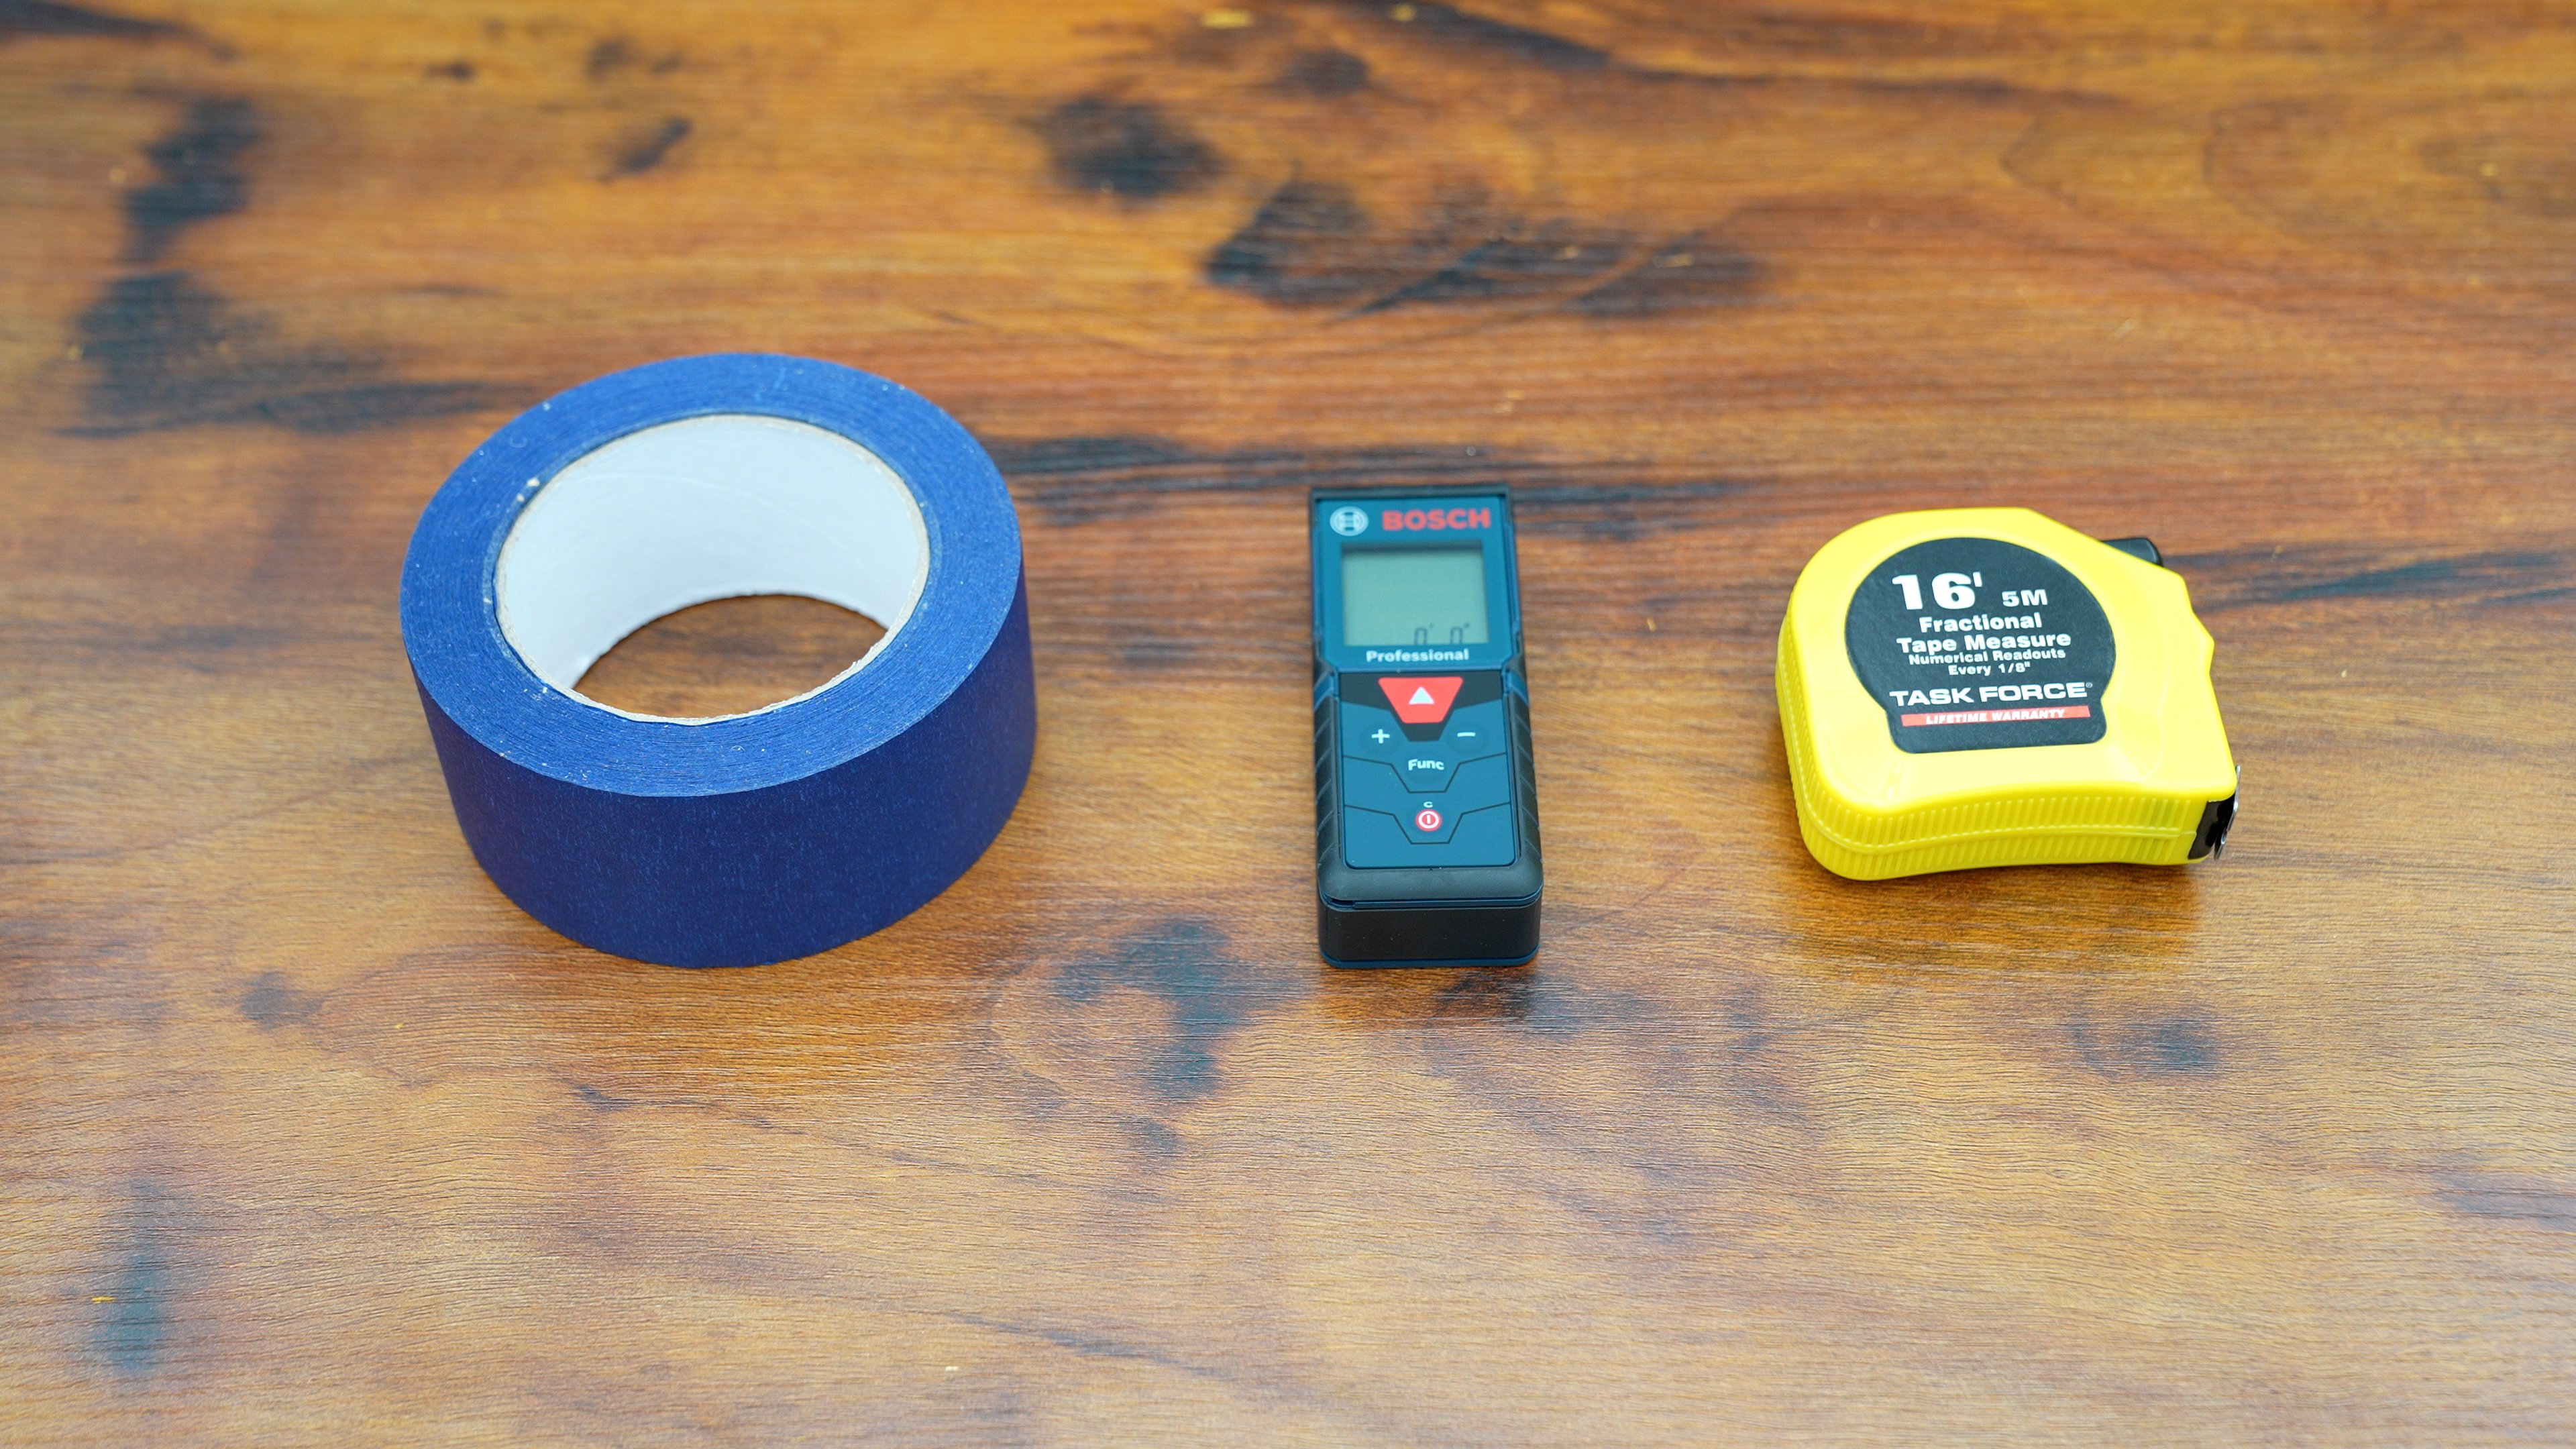
The music you use needs to be full range with plenty of bass information that varies across the lower spectrum. We also like to have a recording with a single vocalist and one with two or more vocalists. The vocalist's tracks do not need to have super full bass. For these tracks, we suggest you pick recordings that sound really good to you and that you are familiar with. We want to send full-range, well-recorded sound to your speakers for these listening tests. When you get things dialed in, hopefully, you will be hearing the music you are familiar with in a new light.
While you may not know these recordings, take a listen to these three to get an idea for the kind of sounds we hope you will use for your testing. For the full range with lots of bass, check out the title track to the movie Wild Things, by George Clinton. Starting at about 40 seconds in you will have a deep bass drum, bass guitar and lots of percussive bass sounds that vary a lot in frequency. When your speakers are positioned properly, these will all be very clear and distinct.
For a single vocalist, check out "Landslide" from Fleetwood Mac. Stevie Nicks is right in the middle to help you get your speakers positioned correctly. And for multiple vocalists, "Cruisin’" on the album Duets by Frank Sinatra. This features Huey Lewis and Gwyneth Paltrow. Or acappella is good too like you can hear with 'Under the Boardwalk' by the Persuasions on their album No Frills. Another great track to play once you are finished to really test things is "Lay Me Down" on the Crosby and Nash album.
These are just suggestions to give you a sense of what to look for in your own test tracks.
Before you start, make darn sure your speaker connections are all properly done. In other words, confirm the speaker wire connected to the positive terminal on your amplifier is also connected to the positive terminal on your speaker. And confirm the left channel of your amplifier's speaker connections goes to your left speaker. If you have powered speakers, those will have some kind of identification for the right and left, so just make sure you have them in the right spot. And for those of you new to this, when you are sitting in your listening chair facing your system, the one on your right side is the right channel.
If you have tower speakers or stands with spikes, it will be easier if you remove the spikes for now. And if your speakers are heavy, it's a good idea to put some kind of slider underneath them so you can easily move them around.
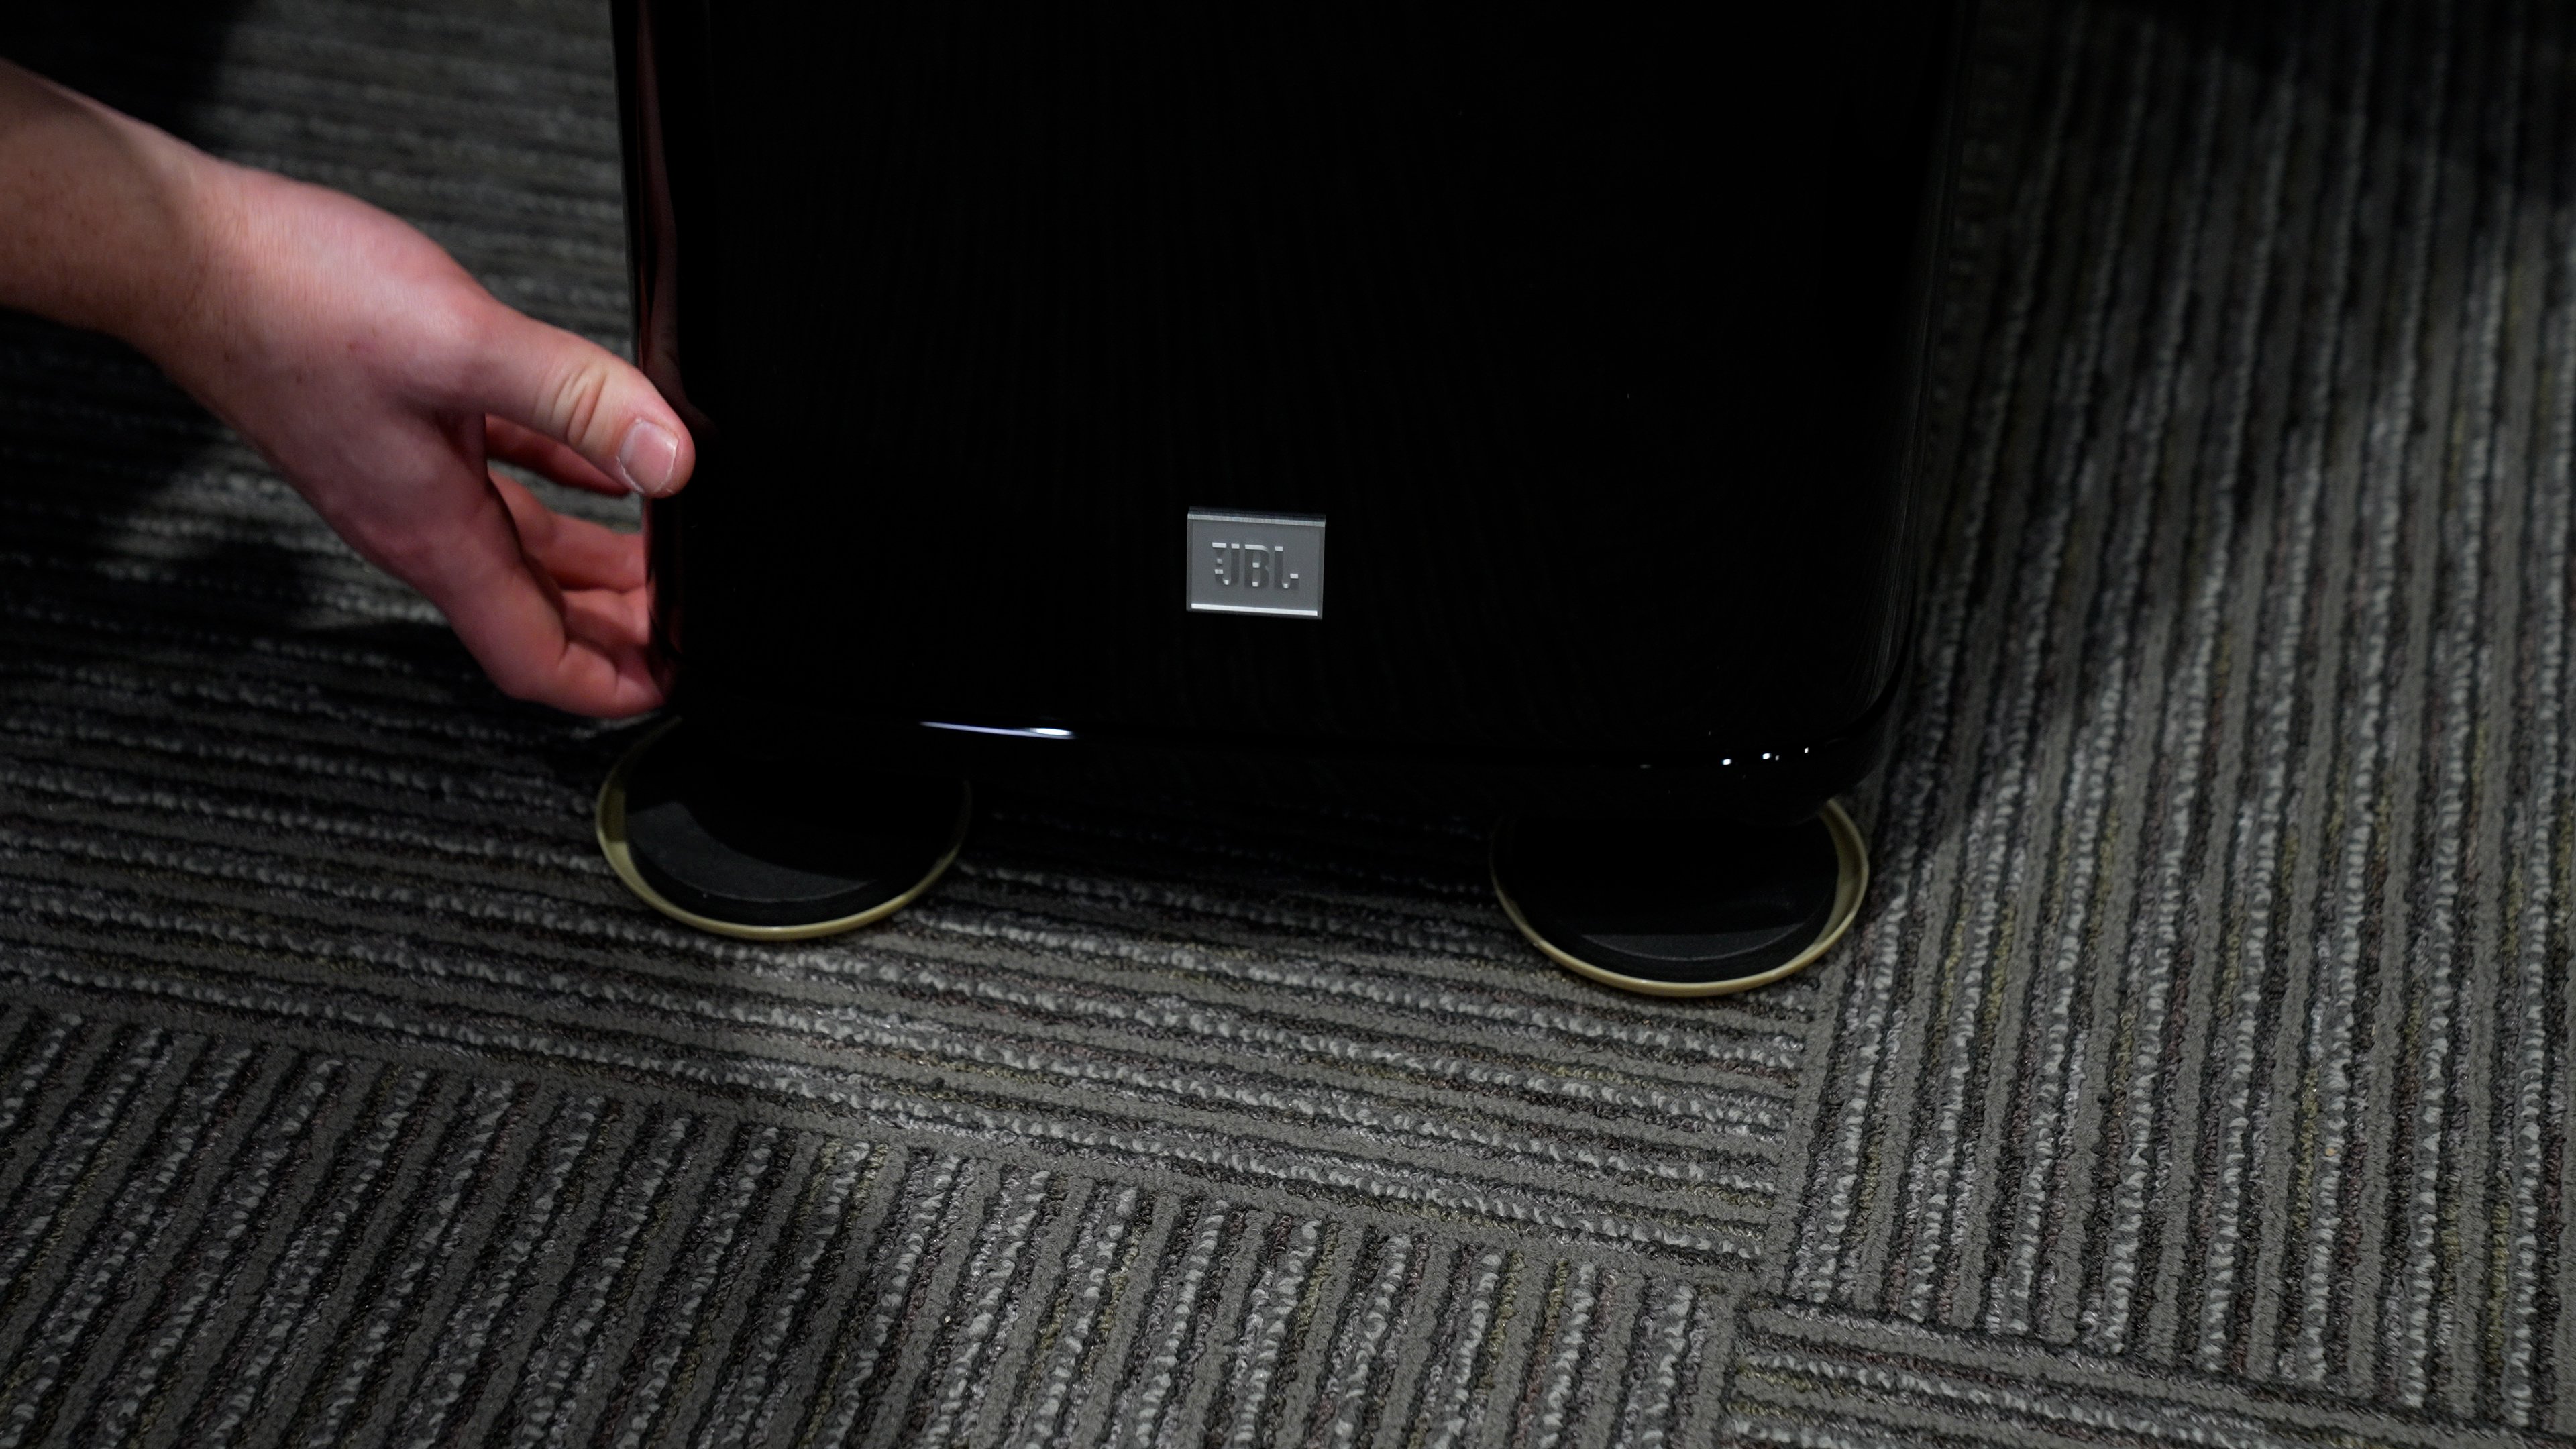
Okay, the basic premise is that your speakers will almost always sound better if they are away from room boundaries. And that back wall where you have them now is most definitely a room boundary! We are going to use math to find the positions in your room that are least likely to introduce all those bad reflections and start from there, rather than spending hours moving your speakers all over the room to find the best spots. Math gives us a head start.
Now, another thing we should point out is that your listening position can have a pretty big influence too. If your chair or couch is right against a wall and you have the freedom to move it out from the wall, even just a little bit, that can sometimes make a big improvement in clarity. You don’t even have to move it to hear it; just sit a foot or two forward and take a listen.
Ok, time to get busy. If your room is a rectangle, measure its length and width. If it's not, use your best judgment to find what might be close to a rectangle, and hopefully, you have at least two opposing walls that could make up a rectangle.
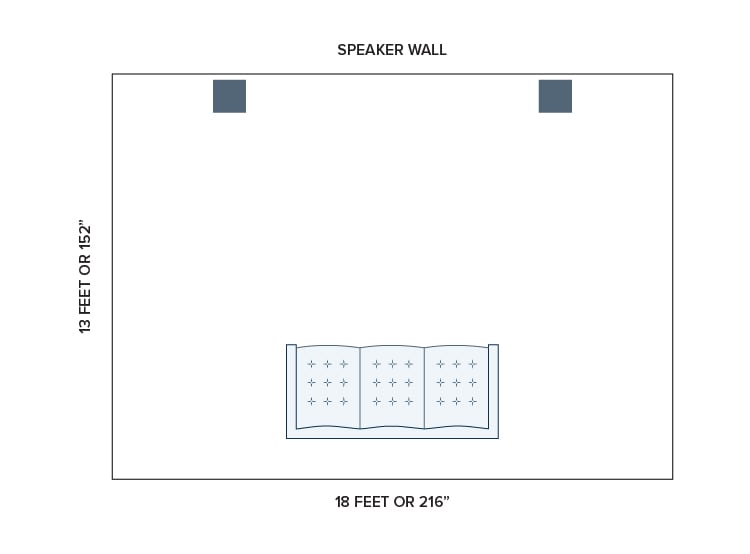
Find the distance from the wall behind your speakers to the opposing wall where your listening position is. Convert this to inches and divide it by odd numbers starting with 3. For example, if that number is 13 feet, that converts to 156 inches. 156 inches divided by 3 is 52 inches, by 5 is 31.2 inches, by 7 is 22.29 inches, by 9 is 17.33 inches and by 11 is 14.18 inches. Round your numbers to the nearest whole and write them down. Now, draw a rectangle of your room. Take the wall your speakers are on and draw lines that are these distances off the rear wall your speakers are on. You don’t really need to get it to scale, as you can just use the measurements, but if you did, it would look something like this:
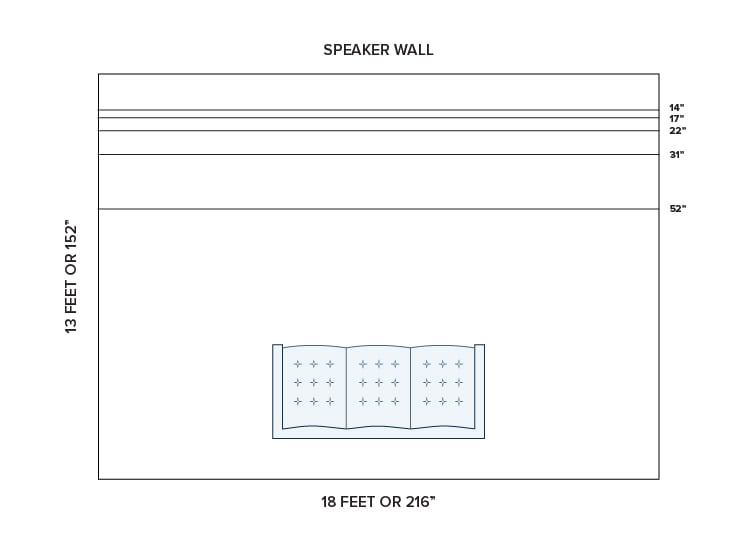
Now, take the other distance from the wall on your left and right and divide it by odd numbers, rounding them to the nearest whole, and write those down. Do the same thing, except now you will do the lines off each of the side walls, and when you are done, it should look something like this:
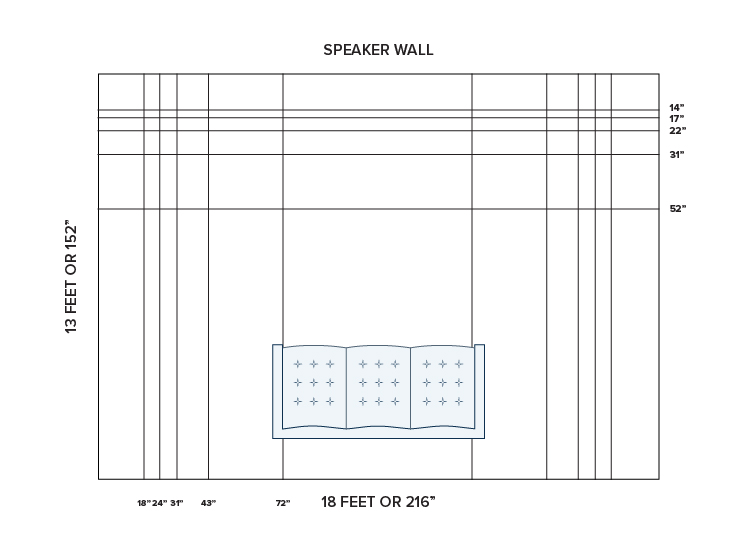
Where these lines intersect are excellent starting points for your speakers to be positioned. Now, you will probably rule out more than half of these as most of us can’t put our speakers in the middle of the room, and you may also have furniture in the way. Just circle the intersecting points that match the positions you are able to place your speakers, and it’s about time to start listening.
For this example, we have decided first to test the intersection that is 43 inches off the side walls and 22 inches off the back wall, as our room has some decent flexibility.
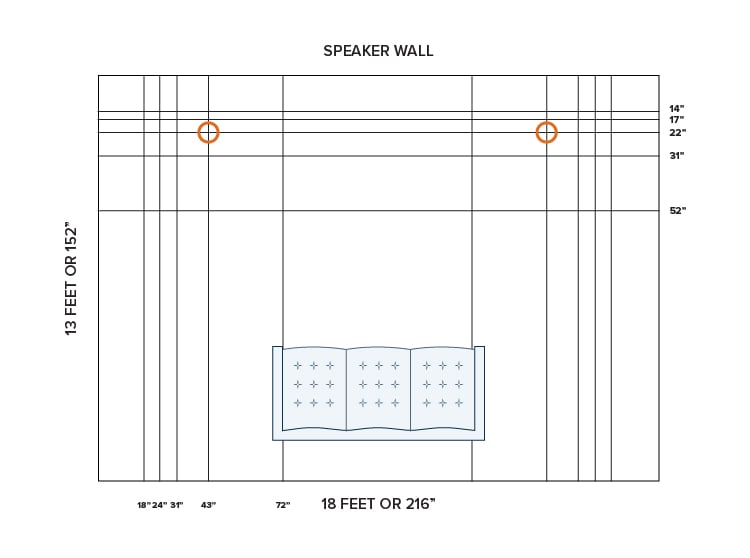
Move your speakers until they are roughly centered over these points. This can be done pretty fast with a tape measure to measure from the side and rear wall. Play those one or two tracks that have some good bass information in them, and see what you think. If you had your speakers against the back wall, we are pretty sure you are going to hear a big improvement in clarity now. What you are listening for is bass and midrange clarity. As bass notes change, they should be similar in volume level and should not sound like they are overpowering the other instruments. You’ll hear all this change a lot as you try different positions.
It’s important to keep both speakers the same distance off the back wall, but if you want to have them at different locations off the side walls, that can be okay, especially if that might center them better on your listening position. At this point, we also want to keep the speakers parallel to the rear wall with no angle in.
After trying about three intersections, you’ll start to get a feel for how the sound is changing, and you’ll likely prefer one position. Once you find that position, try changing the center point 1 or 2 inches either or both ways to hear if the sound gets any better. When you get close, make sure to use a tape measure to confirm each speaker is the exact same distance as the other off the back wall.
When you’re satisfied, measure the distance they are off both the side and rear wall, or put some masking tape around each speaker to mark its best spot. Be sure to write down those numbers in case you get interrupted and need to come back.
Now it's time to play around with what audiophiles call toe-in. This is basically just angling your speakers to try and make the musicians sound more like they are right in front of you. Start with a single vocalist and try angling your speakers in a little bit at a time until the vocals sound dead-centered and pretty small in perceived size. If your room has a lot of reflective surfaces you have not addressed, you may not be able to hear this, as those reflections can make this part hard. We have a whole guide on room acoustics linked below if you need help there.
The toe-in is subjective. You’ll find as you increase the angle, the sound may not be as wide. This part of the setup is very personal, so after you have tried the single vocalist track, try one or two with lots of harmony. Eventually, you’ll find the position that works best for your speakers, room, and personal tastes.
Now you’ll need to measure the corner of each speaker from the rear wall and then either the front or back side from the side wall. During the toe-in tests, one speaker may have moved to not be the exact same distance off the rear wall as the other, so be sure to get that right before your final measurements. These numbers are valuable after you have spent all this time, so write them down and put them in a safe place.
If your speaker has spikes, you’ll want to put them back on now, but this can be the tricky part. We suggest you first remove any tape you used in the first steps and put new tape around at least two sides of the speaker. Install the spikes, then carefully get them in that same position. This can be a little tedious and require rocking them on the spikes, but it's worth it. You will also want to make sure the speaker is level, and the spikes are locked down so there is no rocking. And if you have spade lugs or bare wire connections at your speakers, check to make sure they are still tight after all that moving around.
Pat yourself on the back, and it’s time to start enjoying music at, hopefully, what is a brand-new level. We find that for many people who take a little time to go through this process, it's like getting an entirely new stereo system!
We’re here to Help!
If you have further questions, contact our experts via chat, phone, or email. Or simply visit one of our world-class showrooms to experience speakers, projectors, TVs, and everything in between for yourself before you make a purchase!
If you’re planning your home theater or media room, check out our Home Theater Design page, where we have everything Home Theater related, including our FREE Home Theater Design Tool.
When you buy from Audio Advice, you’re buying from a trusted seller since 1978. We offer Free Shipping, Lifetime Expert Support, and our Price Guarantee. We look forward to serving you!













 Home Theater
 Speakers
 Tower Speakers
 Bookshelf Speakers
 Center Channel Speakers
 Wall & Ceiling Speakers
 Surround Speakers
 Dolby Atmos Speakers
 Subwoofers
 Soundbars
 Speaker Stands & Mounts
 Components
 Home Theater Receivers
 Surround Sound Processors
 Power Amps
 Movie Sources
 TVs & Projectors
 Televisions
 Projectors
 Projector Screens
 TV & Projector Mounts
 Seating & Furniture
 Home Theater Seating
 Media Cabinets
 A/V Racks & Shelves
 Accessories
 Acoustic Treatments
 Absorption Panels
 Bass Trap Panels
 Diffusion Panels
 Acoustic Treatment Packages
 Cables & Accessories
 HDMI Cables
 Analog Cables
 Digital Cables
 USB Cables
 Speaker Cables
 Subwoofer Cables
 Power Management
 Featured & Deals
 Best Sellers
 Sale
Sale
 Home Audio
 Outdoor Speakers
 Portable & Bluetooth
 Wireless Speaker Systems
 Computer Speakers
 Powered Speakers
 Integrated Amplifiers
 Power Amplifiers
 Stereo Preamplifiers
 Stereo Receivers
 Streaming Media Players
 Digital-to-Analog Converters
 CD Players
 Outdoor Entertainment
 Outdoor Subwoofers
 Turntables
 Manual
 Automatic
 Phono Cartridges
 Moving Coil
 Moving Magnet
 Moving Iron
 Mono
Mono
 Phono Preamps
 MC Compatible
 MM Compatible
 Record Cleaning & Care
 Stylus Care
 Cleaning Machines
 Record Cleaning Fluid
 Record Sleeves
 Isolation Systems
 Turntable Setup Tools
 Turntable Cables
 Record Weights
 Turntable Mats
 Headphones
 In-Ear Headphones
 On-Ear Headphones
 Over-Ear Headphones
 Wireless Headphones
 Gaming Headsets
 Headphone Amps & DACs
 Digital Audio Players
 Smart Home
 Deals
Deals Limited Time Deals
 Deals by Category